순서
시작하기전에
이 실습은 인터페이스빌더로 구현된 AutoLayout을 코드로 구현하는데 목적이 있습니다
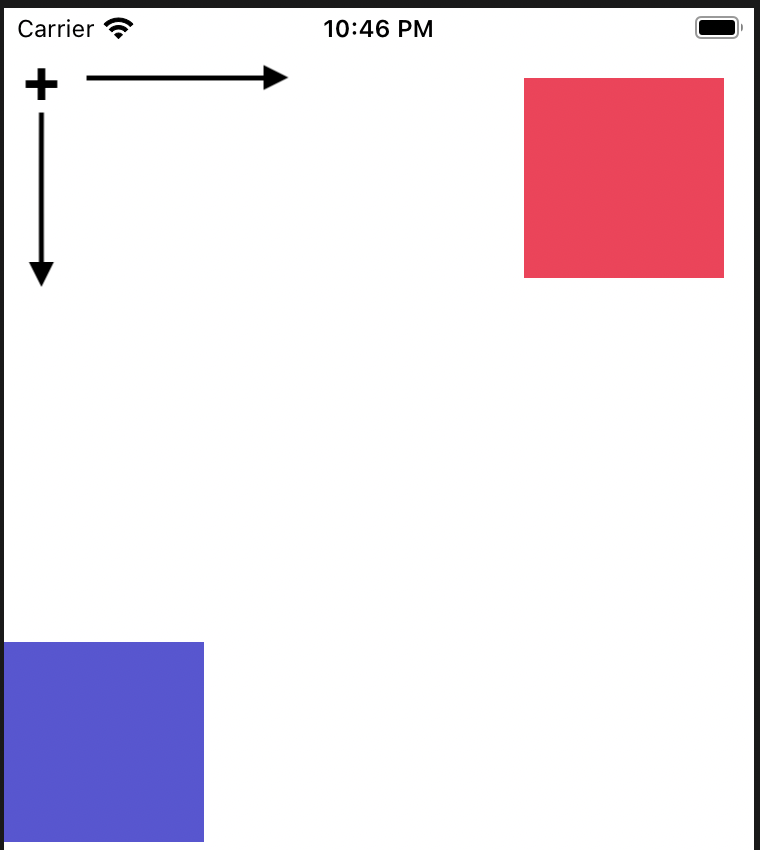
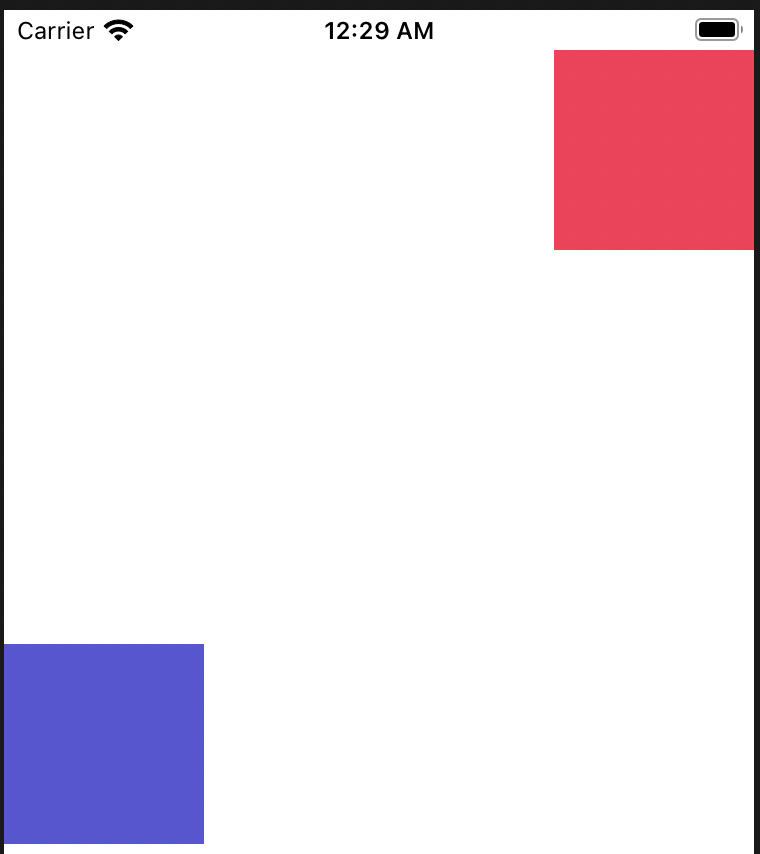
아래의 뷰는 마진으로 50을 갖습니다
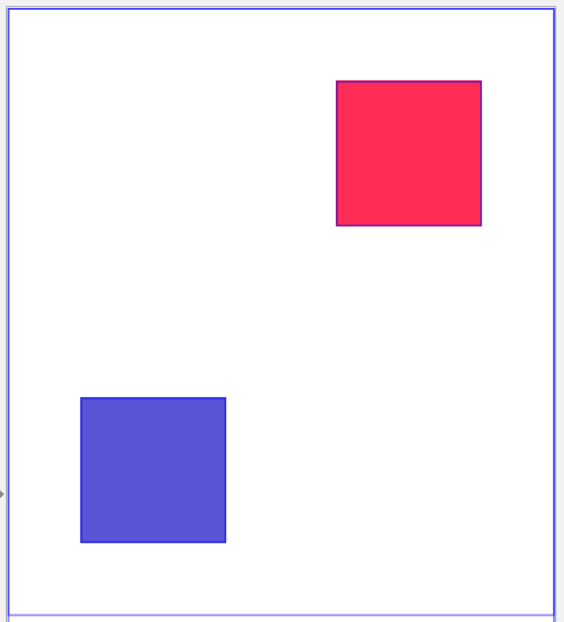

각 빨간색과 파란색은 redView와 blueView로 아웃렛을 선언하고
이를 감싸고 있는 뷰는 topView로 선언했습니다
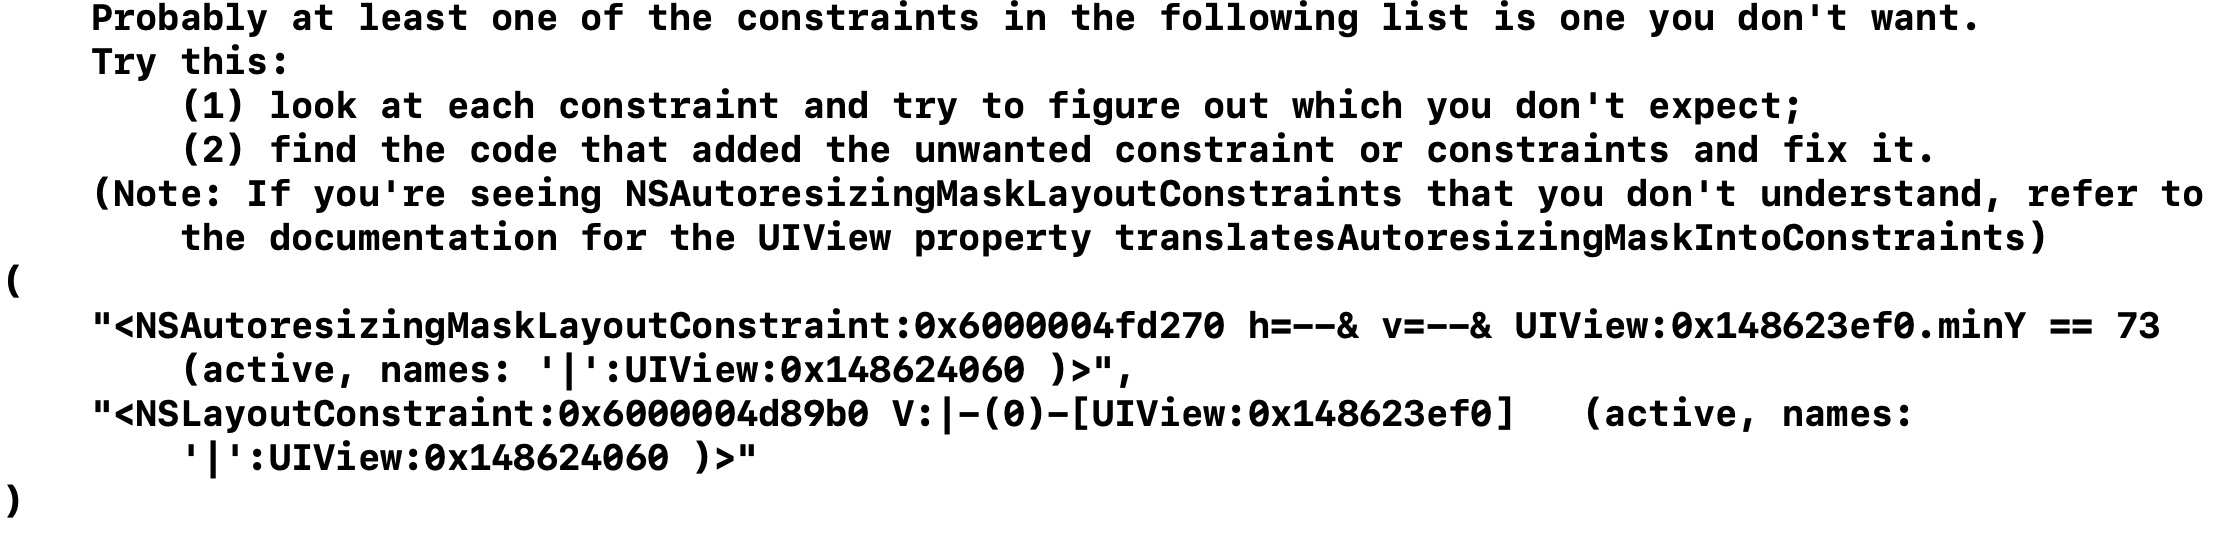
AutoresizingMask오류
제약을 정하지 않은 경우 Autoresizing이 적용됩니다
코드로 제약사항을 추가 할 경우 자동으로 적용된 AutoresizingMask와 충돌할 수 있으므로
꼭 아래의 코드를 추가해야 합니다
|
subview.translatesAutoresizingMaskIntoConstraints = false
|
cs |
추가하지 않으면 두 제약이 서로 충돌하며 아래와 같은 오류가 나타납니다
NSLayoutConstraint
NSLayoutConstraint 클래스를 이용하는 방법입니다
init(item:attribute:relatedBy:toItem:attribute:multiplier:constant:)
위의 생성자를 사용하면 하나의 인스턴스(Constraints)를 정의할 수 있습니다
Constraints를 모두 정의했다면 .activate메서드를 통해 배열형태로 Constraints를 적용할 수 있습니다
item = 적용 View
attribute = NSLayout열거형 멤버를 받습니다 (.leading, .top. bottom ...)
relatedBy = .equal, .lessThanOreuqals, .greaterThanOrequals
toItem = 기준 View
multiplier = 동일
constant = 동일
Margin 미적용
|
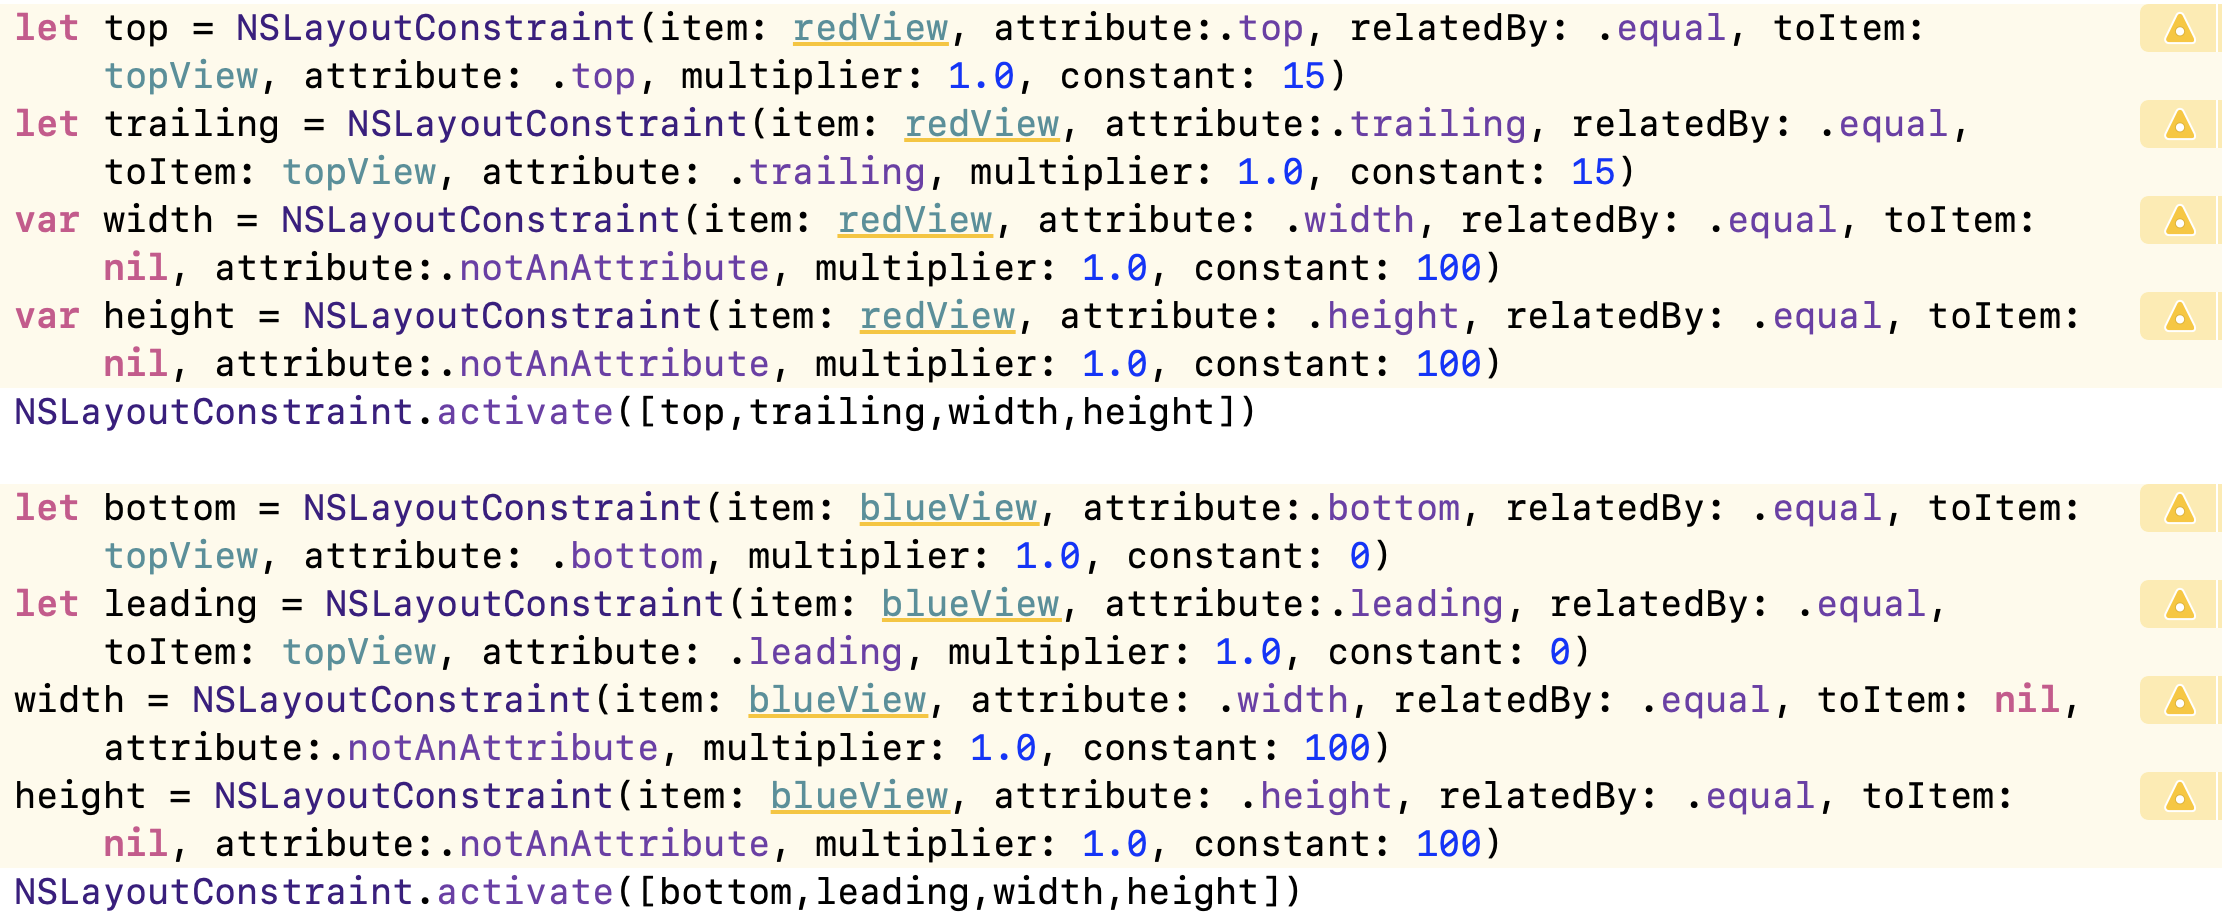
let top = NSLayoutConstraint(item: redView, attribute:.top, relatedBy: .equal, toItem: topView, attribute: .top, multiplier: 1.0, constant: 15)
let trailing = NSLayoutConstraint(item: redView, attribute:.trailing, relatedBy: .equal, toItem: topView, attribute: .trailing, multiplier: 1.0, constant: 15)
var width = NSLayoutConstraint(item: redView, attribute: .width, relatedBy: .equal, toItem: nil, attribute:.notAnAttribute, multiplier: 1.0, constant: 100)
var height = NSLayoutConstraint(item: redView, attribute: .height, relatedBy: .equal, toItem: nil, attribute:.notAnAttribute, multiplier: 1.0, constant: 100)
NSLayoutConstraint.activate([top,trailing,width,height])
let bottom = NSLayoutConstraint(item: blueView, attribute:.bottom, relatedBy: .equal, toItem: topView, attribute: .bottom, multiplier: 1.0, constant: 0)
let leading = NSLayoutConstraint(item: blueView, attribute:.leading, relatedBy: .equal, toItem: topView, attribute: .leading, multiplier: 1.0, constant: 0)
width = NSLayoutConstraint(item: blueView, attribute: .width, relatedBy: .equal, toItem: nil, attribute:.notAnAttribute, multiplier: 1.0, constant: 100)
height = NSLayoutConstraint(item: blueView, attribute: .height, relatedBy: .equal, toItem: nil, attribute:.notAnAttribute, multiplier: 1.0, constant: 100)
NSLayoutConstraint.activate([bottom,leading,width,height])
|
cs |
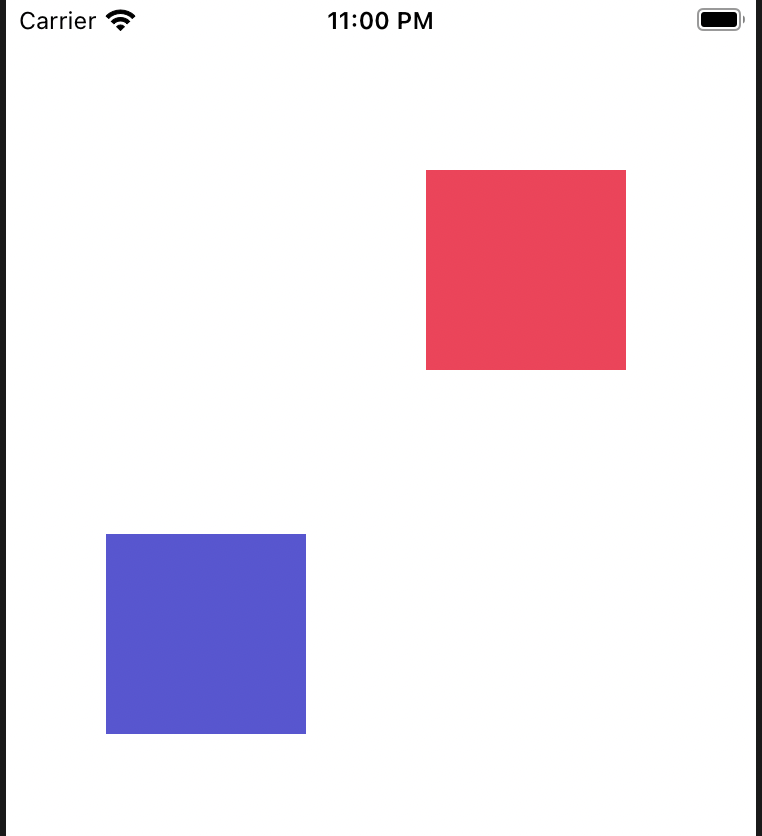
redView에는 top 과 trailing에 constant를 15만큼, blueView에는 bottom, leading에 constant를 0만큼 준 코드입니다
경고가 뜨는 이유는 item의 reView,blueView가 옵셔널타입이기 때문입니다.
!으로 선언되어 자동으로 언래핑을 하니 동작에 문제는 없습니다
width나 height에는 대상view가 없기 때문에 item은 nil, attribute엔 .notAnAttribute 값을 갖습니다
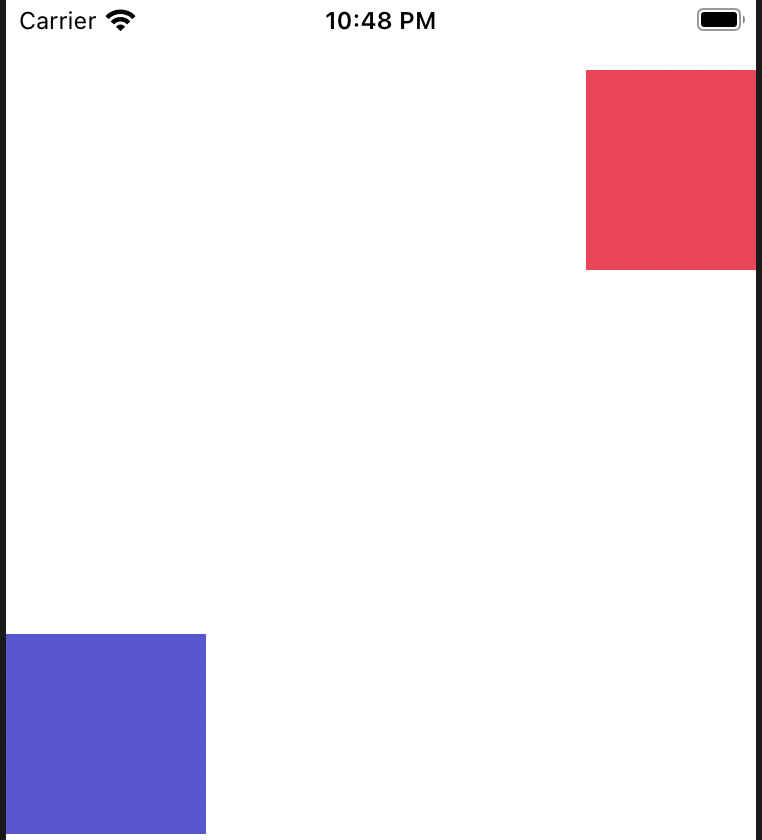
redView의 Constant값을 모두 15로 주니 방향에 문제가 생겼는데요
이 때는 Constant값을 - 하거나 item1과 item2를 서로 변경해야 합니다
Constant는 화살표방향으로 갈 수록 +값을 갖습니다
따라서 top은 15, trailing은 -15 값을 주면 해결할 수 있습니다
또는
item과 toItem을 서로 바꾸어 해결할 수 있습니다
|
let trailing = NSLayoutConstraint(item: topView, attribute:.trailing, relatedBy: .equal, toItem: redView, attribute: .trailing, multiplier: 1.0, constant: 15)
|
cs |
Margin 적용
attribute 인자로 .topMargin .leading 등의 속성값을 넣으면 됩니다
redView/blueView에서 topView의 마진 까지로 이해하면 쉽습니다
따라서 redView의 trailing은 item의 속성에 .trailingMargin을 갖고
나머지 속성들은 toItem 속성에 .*Margin값을 갖습니다
|
let top = NSLayoutConstraint(item: redView, attribute:.top, relatedBy: .equal, toItem: topView, attribute: .topMargin, multiplier: 1.0, constant: 15)
let trailing = NSLayoutConstraint(item: topView, attribute:.trailingMargin, relatedBy: .equal, toItem: redView, attribute: .trailing, multiplier: 1.0, constant: 15)
var width = NSLayoutConstraint(item: redView, attribute: .width, relatedBy: .equal, toItem: nil, attribute:.notAnAttribute, multiplier: 1.0, constant: 100)
var height = NSLayoutConstraint(item: redView, attribute: .height, relatedBy: .equal, toItem: nil, attribute:.notAnAttribute, multiplier: 1.0, constant: 100)
NSLayoutConstraint.activate([top,trailing,width,height])
let bottom = NSLayoutConstraint(item: blueView, attribute:.bottom, relatedBy: .equal, toItem: topView, attribute: .bottomMargin, multiplier: 1.0, constant: 0)
let leading = NSLayoutConstraint(item: blueView, attribute:.leading, relatedBy: .equal, toItem: topView, attribute: .leadingMargin, multiplier: 1.0, constant: 0)
width = NSLayoutConstraint(item: blueView, attribute: .width, relatedBy: .equal, toItem: nil, attribute:.notAnAttribute, multiplier: 1.0, constant: 100)
height = NSLayoutConstraint(item: blueView, attribute: .height, relatedBy: .equal, toItem: nil, attribute:.notAnAttribute, multiplier: 1.0, constant: 100)
NSLayoutConstraint.activate([bottom,leading,width,height])
|
cs |
Visual Foramt Language
정해진 포맷에 따라 비주얼적으로 Constraint를 줄 수 있습니다
|
var horzFmt = "[red(==100)]|"
var vertFmt = "V:|[red(==100)]"
let views: [String: Any] = ["red":redView, "blue": blueView]
var horzConstraints = NSLayoutConstraint.constraints(withVisualFormat: horzFmt, options: [], metrics: nil, views: views)
var vertConstraints = NSLayoutConstraint.constraints(withVisualFormat: vertFmt, options: [], metrics: nil, views: views)
NSLayoutConstraint.activate(horzConstraints + vertConstraints)
horzFmt = "|[blue(100)]"
vertFmt = "V:[blue(100)]|"
horzConstraints = NSLayoutConstraint.constraints(withVisualFormat: horzFmt, options: [], metrics: nil, views: views)
vertConstraints = NSLayoutConstraint.constraints(withVisualFormat: vertFmt, options: [], metrics: nil, views: views)
NSLayoutConstraint.activate(horzConstraints + vertConstraints)
|
cs |
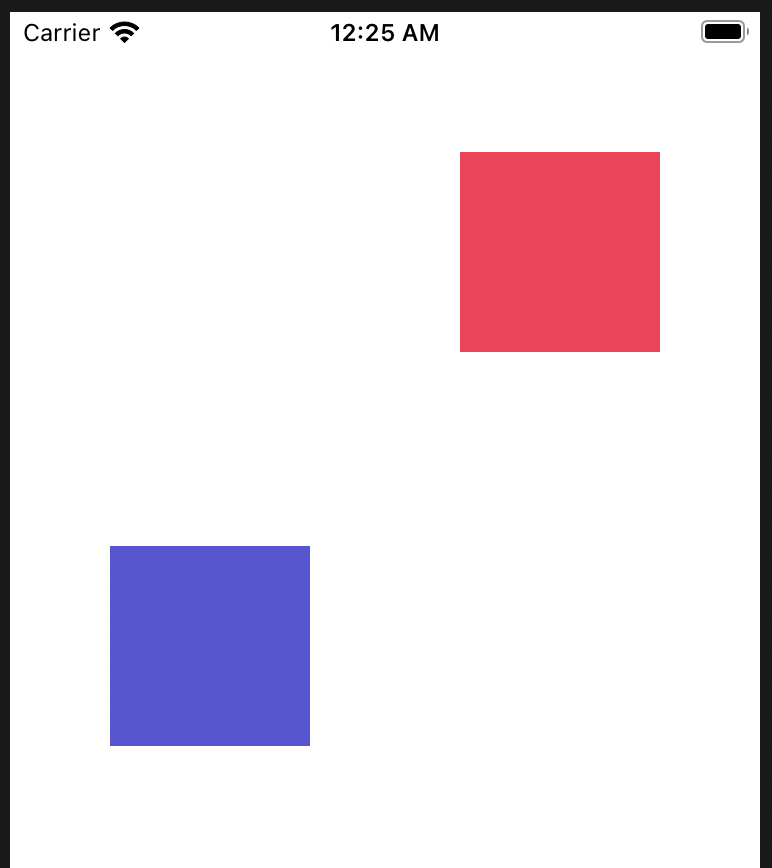
(views딕셔너리 경고는 아까와 마찬가지로 옵셔널타입경고이므로 무시하셔도 됩니다)
horzFmt문자열을 해석해 보겠습니다
red : 임의로 정한 redView의 이름입니다 아래 dictionary에 정의한 값과 일치해야 합니다
(==100) : width를 100, equal로 지정합니다 equal일 때는 (100)으로 생략이 가능합니다
오른쪽 | : 부모뷰의 trailing을 의미합니다
vertFmt 의 V: 는 버티컬을 의미하므로
(100)은 hieght 100, 왼쪽 |는 top을 의미합니다
정리하면
"|-[red(100)]" == red뷰.leading을 부모뷰.leading의 마진에 위치하며 width는 100
"[red(150)-20-]" == red뷰.trailing을 부모뷰.leading에서 20떨어지며 width는 150
앞에 V:만 붙이면 세로로 적용할 수 있습니다
String과 딕셔너리를 모두 정의 했다면
NSLayoutConstraints의 type메서드를 이용해 적용시킬 수 있습니다
자세한 Visaul Foramt Language는 아래 공식문서를 참고해 주세요
Auto Layout Guide: Visual Format Language
developer.apple.com
NSLayoutAnchor
앵커를 사용해 조작합니다
|
topView.layoutMarginsGuide.trailingAnchor.constraint(equalTo: redView.trailingAnchor).isActive = true
topView.layoutMarginsGuide.topAnchor.constraint(equalTo: redView.topAnchor).isActive = true
redView.widthAnchor.constraint(equalToConstant: 100).isActive = true
redView.heightAnchor.constraint(equalToConstant: 100).isActive = true
topView.layoutMarginsGuide.leadingAnchor.constraint(equalTo: blueView.leadingAnchor).isActive = true
topView.layoutMarginsGuide.bottomAnchor.constraint(equalTo: blueView.bottomAnchor).isActive = true
blueView.widthAnchor.constraint(equalToConstant: 100).isActive = true
blueView.heightAnchor.constraint(equalToConstant: 100).isActive = true
|
cs |
margin을 기준으로 배치한 코드입니다
margin없이 view를 기준으로 배치하려면 layoutMarginGuide만 없애고 배치하면 됩니다
1212
|
topView.trailingAnchor.constraint(equalTo: redView.trailingAnchor).isActive = true
topView.topAnchor.constraint(equalTo: redView.topAnchor).isActive = true
redView.widthAnchor.constraint(equalToConstant: 100).isActive = true
redView.heightAnchor.constraint(equalToConstant: 100).isActive = true
topView.leadingAnchor.constraint(equalTo: blueView.leadingAnchor).isActive = true
topView.bottomAnchor.constraint(equalTo: blueView.bottomAnchor).isActive = true
blueView.widthAnchor.constraint(equalToConstant: 100).isActive = true
blueView.heightAnchor.constraint(equalToConstant: 100).isActive = true
|
cs |
https://developer.apple.com/documentation/uikit/uiview/1622520-leadinganchor/
https://developer.apple.com/documentation/appkit/nslayoutguide/1534720-leadinganchor/
참고자료
KxCoding 유튜브 강의
'🍎iOS프로그래밍 > AutoLayout' 카테고리의 다른 글
| 오토레이아웃 Auto Layout - 5(실습1) (0) | 2022.01.16 |
|---|---|
| 오토레이아웃 Auto Layout - 4(기타) (0) | 2022.01.12 |
| 오토레이아웃(AutoLayout)-3(적용) (0) | 2022.01.12 |
| 오토레이아웃(AutoLayout)-2(적용준비) (0) | 2022.01.11 |
| 오토 레이아웃(Auto Layout) - 1 (등장배경) (0) | 2022.01.10 |


댓글